
Authentication and Authorization in ASP.NET 6.0 API With JWT using Identity Framework


![]() Download Sample Project - 14KB
Download Sample Project - 14KB
Authentication is the process of identifying a user or client making a request to our application. Authorization is the process of determining whether a user or client has access to a specific resource or functionality within our application. In this article we will see how to authenticate and authorize ASP.NET API endpoint by using JWT token. And we will use ASP.NET Identity framework to store user credentials in an SQL server database, and we will use Entity framework and Identity framework for database operations. Also, please use donwload project files link to download sample project. Before we will start let's see few terms:
ASP.NET Core Identity
ASP.NET Core Identity is a membership system that provides authentication and authorization functionality out-of-the-box. It supports a variety of authentication methods such as cookies, OAuth, OpenID Connect, and more. It also provides a user management system with features like password hashing, two-factor authentication, and account lockout.
JWT (JSON Web Tokens) Authentication
JSON Web Tokens (JWT) is a popular authentication mechanism that uses JSON-based tokens to authenticate users. It can be used in combination with ASP.NET Core Identity or with a custom authentication scheme. JSON Web Token (JWT) is an open standard (RFC 7519) that defines a compact and self-contained way for securely transmitting information between parties as a JSON object. This information can be verified and trusted because it is digitally signed. JWTs can be signed using a secret (with the HMAC algorithm) or a public/private key pair using RSA or ECDSA.
In its compact form, JSON Web Tokens consist of three parts separated by dots (.), which are:
- Header
- Payload
- Signature
Therefore, a JWT typically looks like the following.
xxxx.yyyy.zzzz
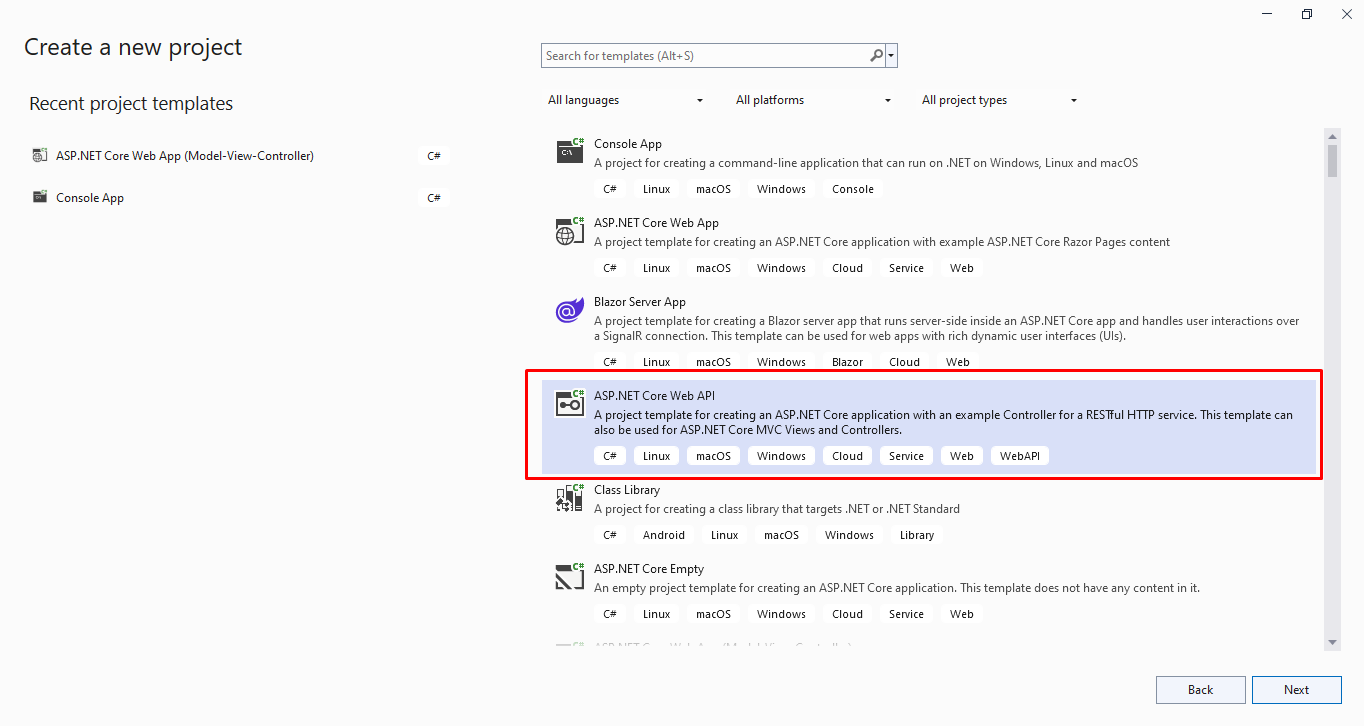
Create an ASP.NET Core Web API using Visual Studio 2022
We require Visual Studio 2022 to create .NET 6.0 applications. We can choose ASP.NET Core Web API template from Visual Studio 2022:
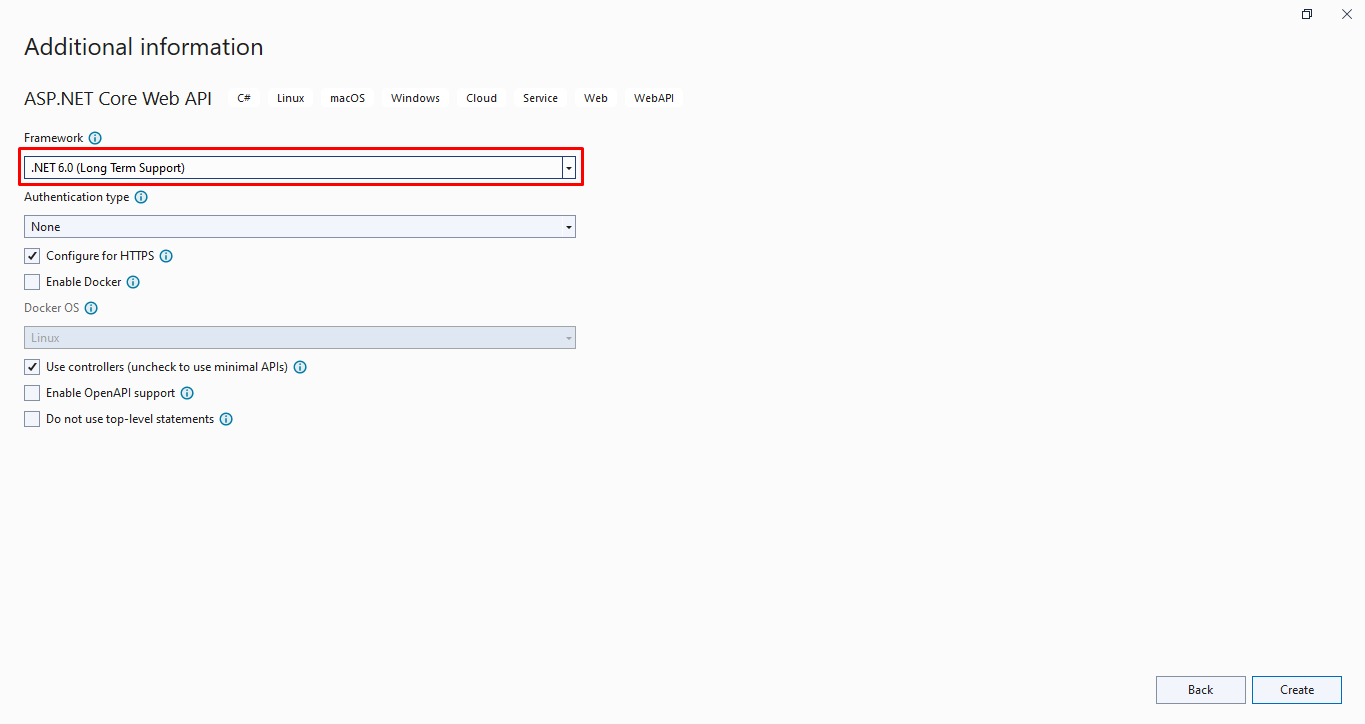
We may give a suitable name for our project and choose the .NET 6.0 framework as it has long term support.
Packages to Install
Install the following libraries below into the new project. We can use NuGet package manger to install these packages:
- Microsoft.EntityFrameworkCore.SqlServer
- Microsoft.EntityFrameworkCore.Tools
- Microsoft.AspNetCore.Identity.EntityFrameworkCore
- Microsoft.AspNetCore.Authentication.JwtBearer
- Swashbuckle.AspNetCore
Add DB connection string and JWT tocket setting in appsettings.json
{
  "Logging": {
    "LogLevel": {
      "Default": "Information",
      "Microsoft.AspNetCore": "Warning"
    }
  },
  "ConnectionStrings": {
    "DefaultConnection": "Data Source=ServerName;Initial Catalog=MyDataBase;Integrated Security=SSPI;TrustServerCertificate=True"
  },
  "JWTAppSettings": {
    "ValidAudience": "http://localhost:",
    "ValidIssuer": "http://localhost:",
    "Secret": "JWTAuthenticationSecuredPasswordVVVp1OH7Yzyr"
  }
}
Add Application DbContext
Create ApiDbContext by extending IdentityDbContext:
using Microsoft.AspNetCore.Identity.EntityFrameworkCore;
using Microsoft.AspNetCore.Identity;
using Microsoft.EntityFrameworkCore;

namespace Noc.Api.Models
{
    public class ApiDbContext : IdentityDbContext<IdentityUser>
    {
        public ApiDbContext(DbContextOptions<ApiDbContext> options)
            : base(options)
        {
        }

        protected override void OnModelCreating(ModelBuilder builder)
        {
            base.OnModelCreating(builder);
        }
    }
}
Create enum say "UserRoles"
namespace Noc.Api.Models.Enum
{
    public enum UserRoles
    {
        Admin,
        User
    }
}
Create class say "JWTAppSettings" to map appsetting section:
using System;
using System.Collections.Generic;
using System.Linq;
using System.Text;
using System.Threading.Tasks;

namespace Noc.Api.Models.AppSettings
{
    public class JWTAppSettings
    {
        public string ValidAudience { get; set; }
        public string ValidIssuer { get; set; }
        public string Secret { get; set; }
    }
}
Create different classes for new user registration and login
- Registration models
using System;
using System.Collections.Generic;
using System.ComponentModel.DataAnnotations;
using System.Linq;
using System.Text;
using System.Threading.Tasks;

namespace Noc.Api.Models
{
    public class RegisterViewModel
    {
        [Required(ErrorMessage = "User Name is required")]
        public string? Username { get; set; }

        [EmailAddress]
        [Required(ErrorMessage = "Email is required")]
        public string? Email { get; set; }

        [Required(ErrorMessage = "Password is required")]
        public string? Password { get; set; }
    }
}
using System;
using System.Collections.Generic;
using System.Linq;
using System.Text;
using System.Threading.Tasks;
namespace Noc.Api.Models
{
public class ResponseViewModel
{
public string? Status { get; set; }
public string? Message { get; set; }
}
} - Login Models
using System;
using System.Collections.Generic;
using System.ComponentModel.DataAnnotations;
using System.Linq;
using System.Text;
using System.Threading.Tasks;

namespace Noc.Api.Models
{
    public class LoginViewModel
    {
        [Required(ErrorMessage = "User Name is required")]
        public string? Username { get; set; }

        [Required(ErrorMessage = "Password is required")]
        public string? Password { get; set; }
    }
}
using System;
using System.Collections.Generic;
using System.Linq;
using System.Text;
using System.Threading.Tasks;
namespace Noc.Api.Models
{
public class LoginResponseViewModel
{
public string Token { get; set; }
public DateTime Expiration { get; set; }
}
}
Create Identity Service
It will contain different method for login and registration:
using Noc.Api.Models;

namespace Noc.Api.Service
{
    public interface IIdentityService
    {
        Task<LoginResponseViewModel> LoginAsync(LoginViewModel loginViewModel);
        Task<ResponseViewModel> RegisterAsync(RegisterViewModel registerViewModel);
        Task<ResponseViewModel> RegisterAdminAsync(RegisterViewModel registerViewModel);
    }
}
using Azure;
using Microsoft.AspNetCore.Http;
using Microsoft.AspNetCore.Identity;
using Microsoft.AspNetCore.Mvc;
using Microsoft.Extensions.Logging;
using Microsoft.Extensions.Options;
using Microsoft.IdentityModel.Tokens;
using Noc.Api.Models;
using Noc.Api.Models.AppSettings;
using Noc.Api.Models.Enum;
using System.IdentityModel.Tokens.Jwt;
using System.Linq;
using System.Security.Claims;
using System.Text;
using System.Threading.Tasks;

namespace Noc.Api.Service
{
    public class IdentityService: IIdentityService
    {
        private readonly UserManager<IdentityUser> _userManager;
        private readonly RoleManager<IdentityRole> _roleManager;
        private readonly JWTAppSettings _jWTAppSettings;

        public IdentityService(UserManager<IdentityUser> userManager,
            RoleManager<IdentityRole> roleManager,
            IOptions<JWTAppSettings> jWTAppSettings)
        {
            _userManager = userManager;
            _roleManager = roleManager;
            _jWTAppSettings=jWTAppSettings.Value;
        }

        public async Task<LoginResponseViewModel> LoginAsync(LoginViewModel loginViewModel)
        {
            var user = await _userManager.FindByNameAsync(loginViewModel.Username);
            if (user != null && await _userManager.CheckPasswordAsync(user, loginViewModel.Password))
            {
                var userRoles = await _userManager.GetRolesAsync(user);

                var authClaims = new List<Claim>
                {
                    new Claim(ClaimTypes.Name, user.UserName),
                    new Claim(JwtRegisteredClaimNames.Jti, Guid.NewGuid().ToString()),
                };

                foreach (var userRole in userRoles)
                {
                    authClaims.Add(new Claim(ClaimTypes.Role, userRole));
                }

                var token = GetToken(authClaims);

                return new LoginResponseViewModel
                {
                    Token = new JwtSecurityTokenHandler().WriteToken(token),
                    Expiration = token.ValidTo
                };
            }
            return new LoginResponseViewModel { };
        }

        public async Task<ResponseViewModel> RegisterAsync(RegisterViewModel registerViewModel)
        {
            var userExists = await _userManager.FindByNameAsync(registerViewModel.Username);
            if (userExists != null)
                return new ResponseViewModel { Status = "Error", Message = "User already exists!" };

            IdentityUser user = new()
            {
                Email = registerViewModel.Email,
                SecurityStamp = Guid.NewGuid().ToString(),
                UserName = registerViewModel.Username
            };
            var result = await _userManager.CreateAsync(user, registerViewModel.Password);
            if (!result.Succeeded)
                return new ResponseViewModel { Status = "Error", Message = "User creation failed! Please check user details and try again." };

            return new ResponseViewModel { Status = "Success", Message = "User created successfully!" };
        }

        public async Task<ResponseViewModel> RegisterAdminAsync(RegisterViewModel registerViewModel)
        {
            var userExists = await _userManager.FindByNameAsync(registerViewModel.Username);
            if (userExists != null)
                return new ResponseViewModel { Status = "Error", Message = "User already exists!" };

            IdentityUser user = new()
            {
                Email = registerViewModel.Email,
                SecurityStamp = Guid.NewGuid().ToString(),
                UserName = registerViewModel.Username
            };
            var result = await _userManager.CreateAsync(user, registerViewModel.Password);
            if (!result.Succeeded)
                return new ResponseViewModel { Status = "Error", Message = "User creation failed! Please check user details and try again." };

            if (!await _roleManager.RoleExistsAsync(UserRoles.Admin.ToString()))
                await _roleManager.CreateAsync(new IdentityRole(UserRoles.Admin.ToString()));
            if (!await _roleManager.RoleExistsAsync(UserRoles.User.ToString()))
                await _roleManager.CreateAsync(new IdentityRole(UserRoles.User.ToString()));

            if (await _roleManager.RoleExistsAsync(UserRoles.Admin.ToString()))
            {
                await _userManager.AddToRoleAsync(user, UserRoles.Admin.ToString());
            }
            if (await _roleManager.RoleExistsAsync(UserRoles.Admin.ToString()))
            {
                await _userManager.AddToRoleAsync(user, UserRoles.User.ToString());
            }
            return new ResponseViewModel { Status = "Success", Message = "User created successfully!" };
        }

        private JwtSecurityToken GetToken(List<Claim> authClaims)
        {
            var authSigningKey = new SymmetricSecurityKey(Encoding.UTF8.GetBytes(_jWTAppSettings.Secret));

            var token = new JwtSecurityToken(
                issuer: _jWTAppSettings.ValidIssuer,
                audience: _jWTAppSettings.ValidAudience,
                expires: DateTime.Now.AddHours(3),
                claims: authClaims,
                signingCredentials: new SigningCredentials(authSigningKey, SecurityAlgorithms.HmacSha256)
                );

            return token;
        }
    }
}
Program.cs
In .NET 6.0, Microsoft removed the Startup class and only kept Program class. We must define all our dependency injection and other configurations inside the Program class.
using Microsoft.AspNetCore.Authentication.JwtBearer;
using Microsoft.AspNetCore.Identity;
using Microsoft.EntityFrameworkCore;
using Microsoft.IdentityModel.Tokens;
using Noc.Api.Models;
using Noc.Api.Models.AppSettings;
using Noc.Api.Service;
using System.Text;

var builder = WebApplication.CreateBuilder(args);

// Add services to the container.

builder.Services.AddControllers();

builder.Services.AddDbContext<ApiDbContext>(options =>
{
    options.UseSqlServer(builder.Configuration.GetConnectionString("DefaultConnection"));
});

// For Identity
builder.Services.AddIdentity<IdentityUser, IdentityRole>()
    .AddEntityFrameworkStores<ApiDbContext>()
    .AddDefaultTokenProviders();

// Adding Authentication
builder.Services.AddAuthentication(options =>
{
    options.DefaultAuthenticateScheme = JwtBearerDefaults.AuthenticationScheme;
    options.DefaultChallengeScheme = JwtBearerDefaults.AuthenticationScheme;
    options.DefaultScheme = JwtBearerDefaults.AuthenticationScheme;
})
// Adding Jwt Bearer
.AddJwtBearer(options =>
{
    options.SaveToken = true;
    options.RequireHttpsMetadata = false;
    options.TokenValidationParameters = new TokenValidationParameters()
    {
        ValidateIssuer = true,
        ValidateAudience = true,
        ValidAudience = builder.Configuration.GetSection("JWTAppSettings:ValidAudience").Value,
        ValidIssuer = builder.Configuration.GetSection("JWTAppSettings:ValidIssuer").Value,
        IssuerSigningKey = new SymmetricSecurityKey(Encoding.UTF8.GetBytes(builder.Configuration.GetSection("JWTAppSettings:Secret").Value))
    };
});

builder.Services.AddEndpointsApiExplorer();
builder.Services.AddSwaggerGen();

builder.Services.AddScoped<IIdentityService, IdentityService>();
builder.Services.Configure<JWTAppSettings>(builder.Configuration.GetSection("JWTAppSettings"));

var app = builder.Build();

// Configure the HTTP request pipeline.


app.UseSwagger();
app.UseSwaggerUI();

app.UseHttpsRedirection();

// Authentication & Authorization
app.UseAuthentication();
app.UseAuthorization();

app.MapControllers();

app.Run();
Create Identity Controller to expose different endpoints like login, register, etc
using Microsoft.AspNetCore.Mvc;
using Noc.Api.Models;
using Noc.Api.Service;

namespace Noc.Api.Controllers
{
    [Route("api/[controller]")]
    [ApiController]
    public class IdentityController : ControllerBase
    {
        private readonly IIdentityService _identityService;

        public IdentityController(IIdentityService identityService)
        {
            _identityService = identityService;
        }

        [HttpPost("login")]
        public async Task<IActionResult> Login([FromBody] LoginViewModel model)
        {
            var result = await _identityService.LoginAsync(model);
            if (!string.IsNullOrEmpty(result?.Token))
            {
                return Ok(result);
            }
            return Unauthorized();
        }

        [HttpPost("register")]
        public async Task<IActionResult> Register([FromBody] RegisterViewModel model)
        {
            var result = await _identityService.RegisterAsync(model);
            return Ok(result);
        }

        [HttpPost("register-admin")]
        public async Task<IActionResult> RegisterAdmin([FromBody] RegisterViewModel model)
        {

            var result = await _identityService.RegisterAdminAsync(model);
            return Ok(result);
        }
    }
}
Add Db migration and create database
We need to create a database and tables before running the application. As we are using entity framework, we can use below database migration command with package manger console to create a migration script.
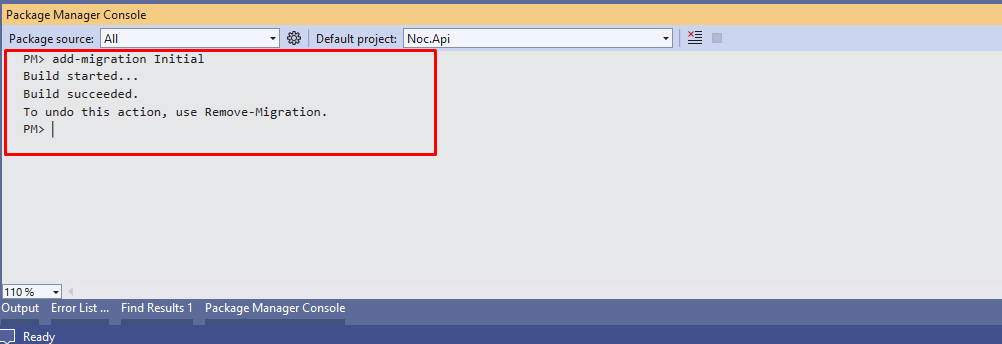
Use the command below to create database and tables.
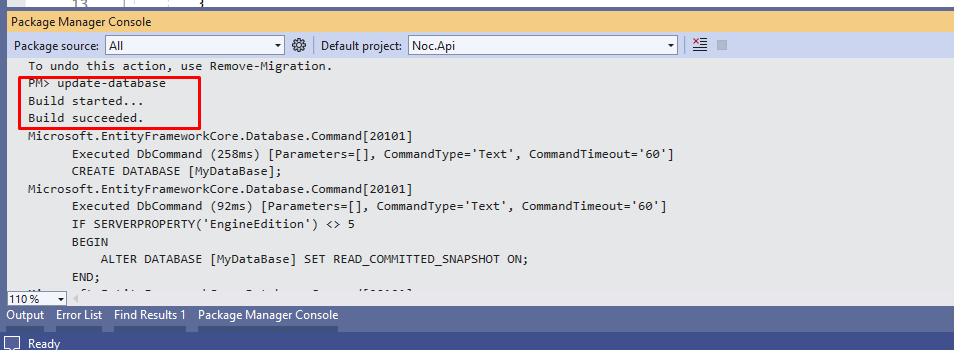
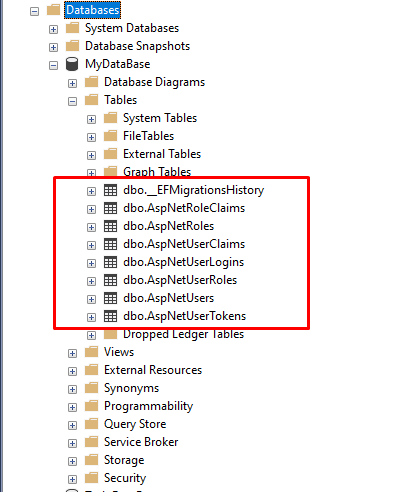
Now, we can check database and we will see following tables:
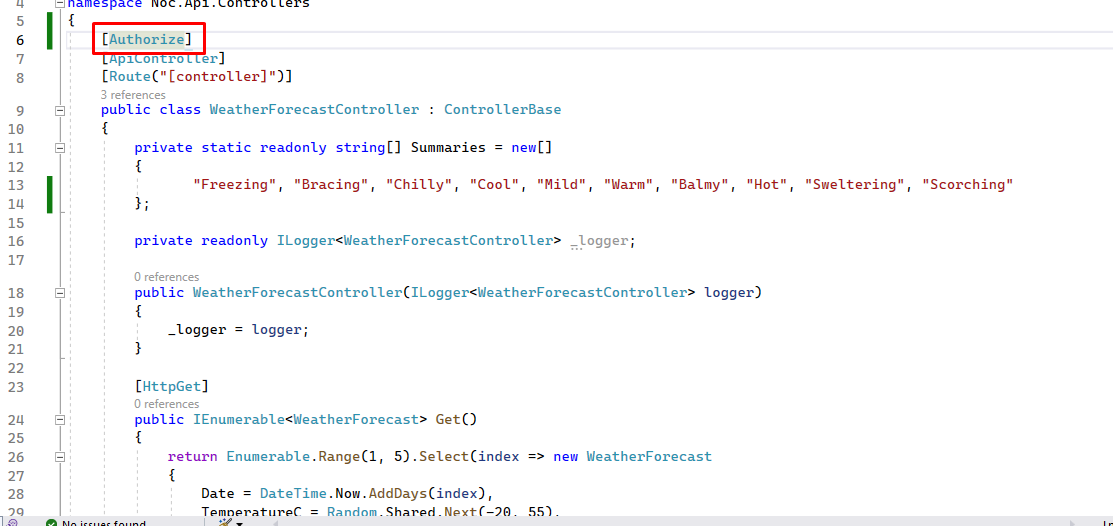
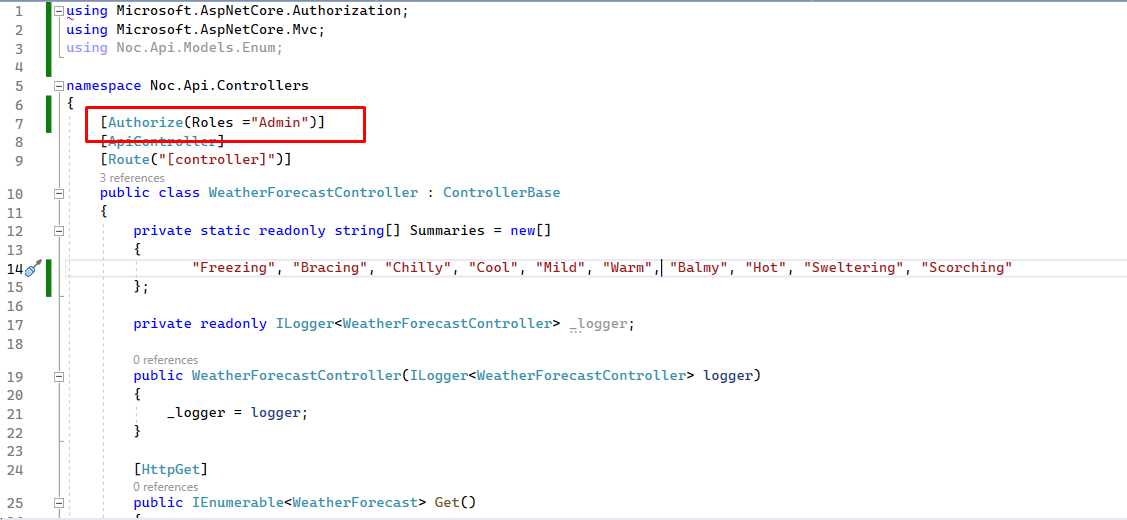
Add Authorize attribute
Let's add Authorize attribute at controller
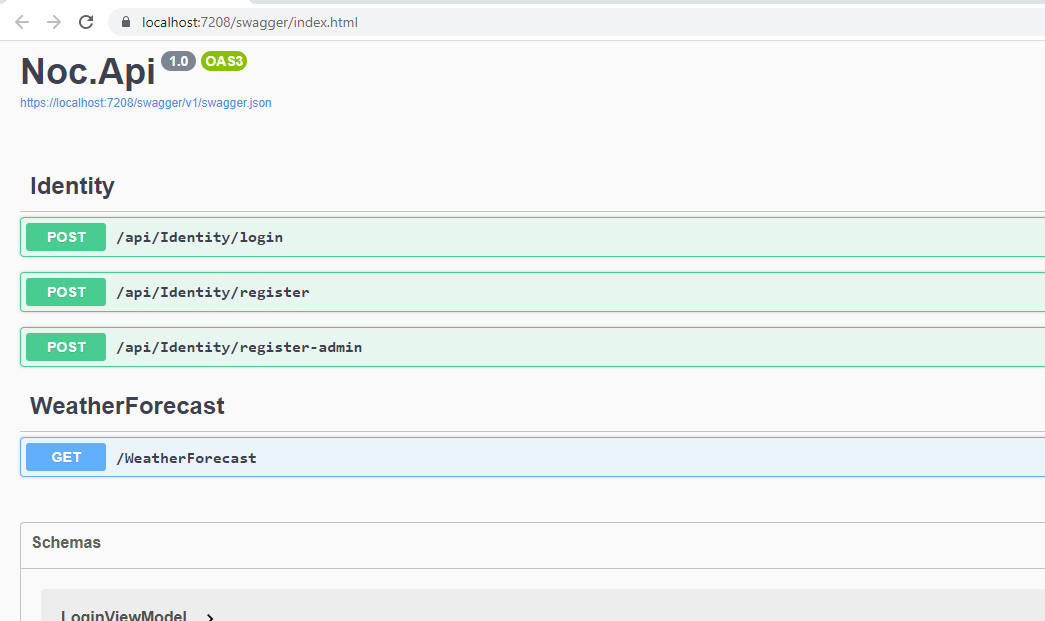
Now all set. Let's run the application. You will see following swagger page
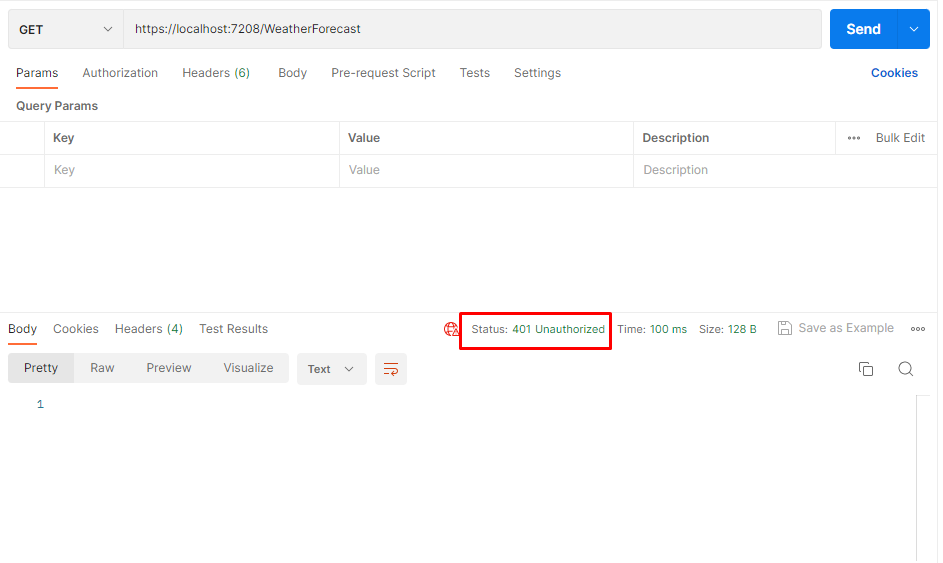
Testing API endpoints in postman
Now we can run the application and try to access get method in weatherforecast controller from Postman tool and you will see 401 unauthorize response
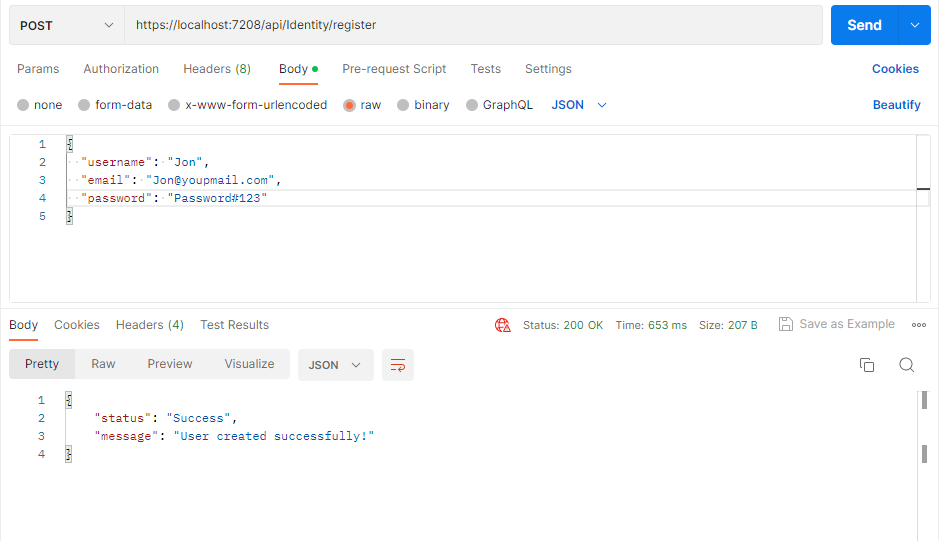
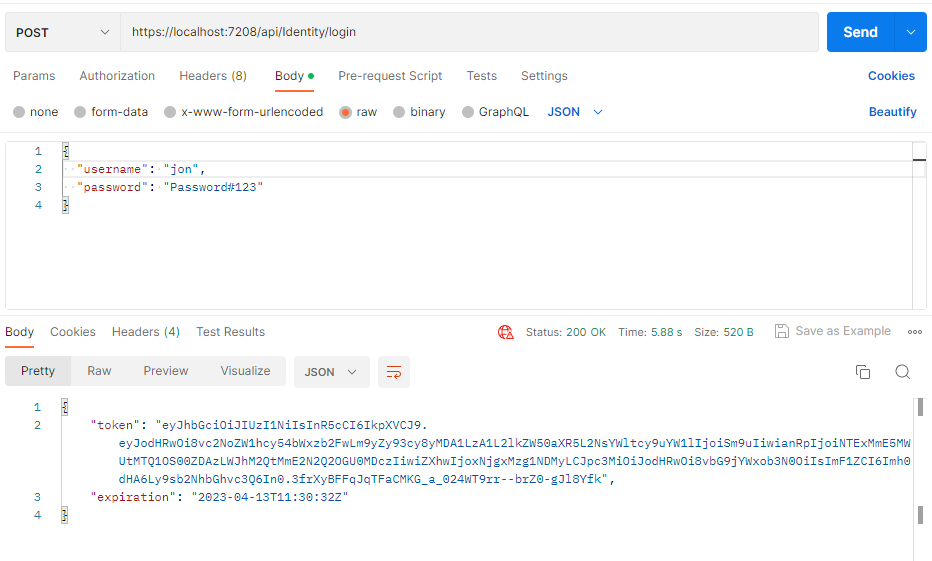
Register an user and then login to get acess tocket to access above endpoint
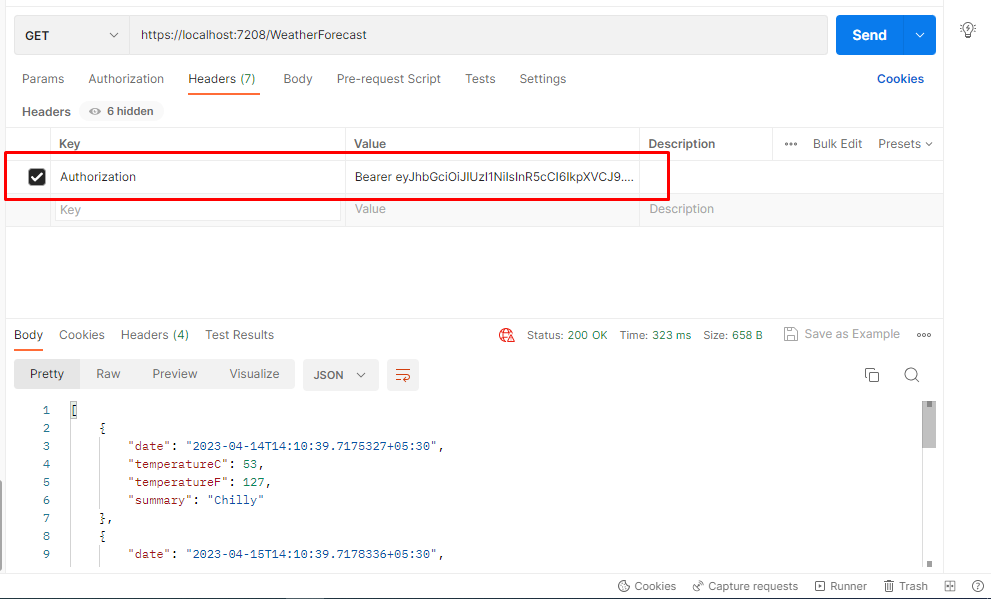
Now let's try with this jwt token to authorize the weather endpoint. And now we will see data with 200 status code
Now, let's change the weatherforecast controller with role-based authorization.
Rerun application and try to access the enpoint. Now we will see 403 forbidden status code
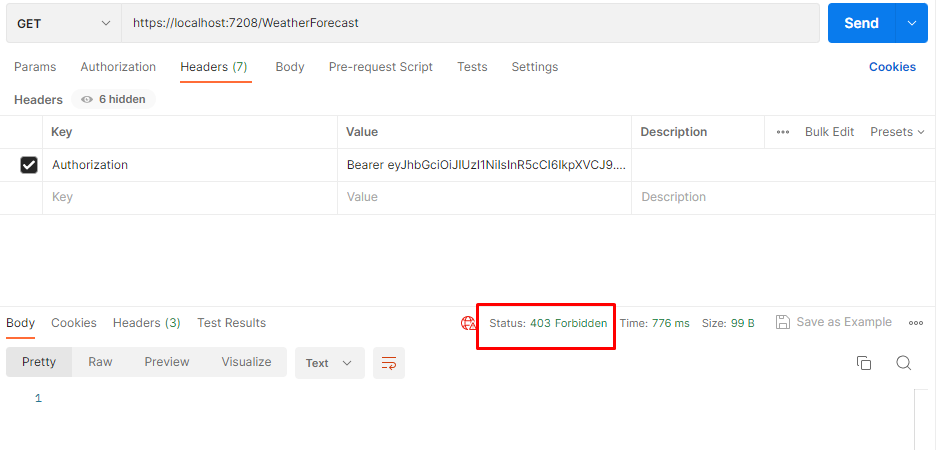
We have received a 403 forbidden error instead of 401 now. Even though we are passing a valid token but we don’t have sufficient privilege to access the controller. To access this controller, the user must have an admin role permission. Current user is a normal user and does not have any admin role permission.
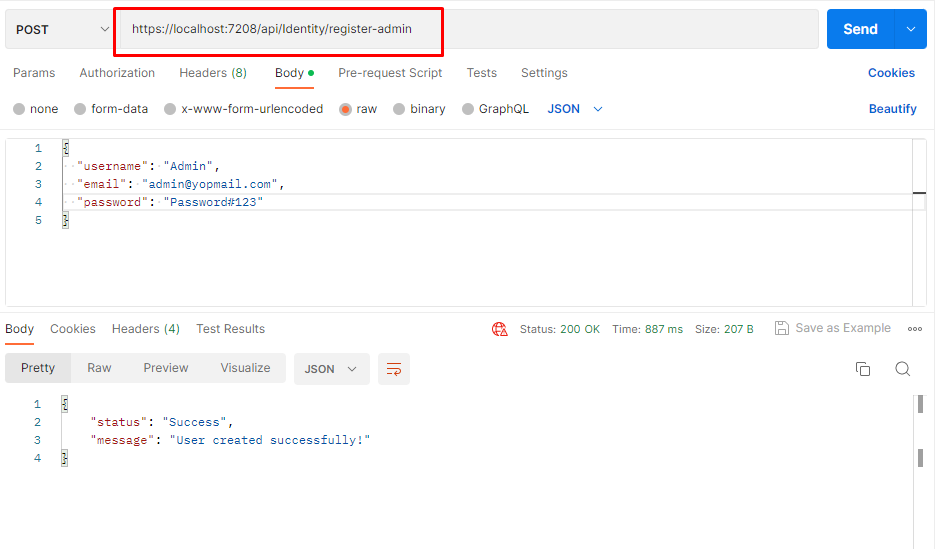
Let's create a new user with an admin role permission. We already have a method “register-admin” in authenticate controller for the same purpose.
Get admin access token
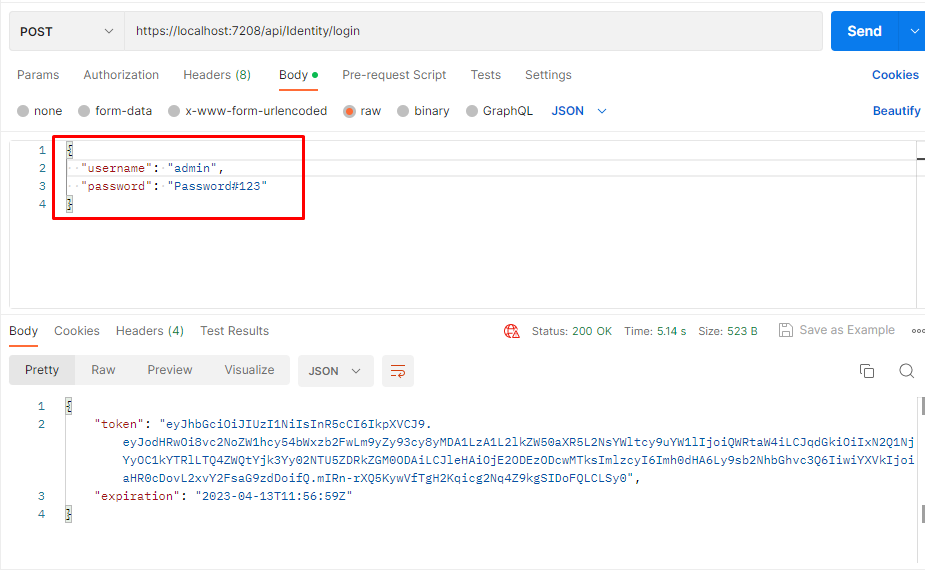
Now, we can use this token instead of the old token to access the weatherforecast controller.
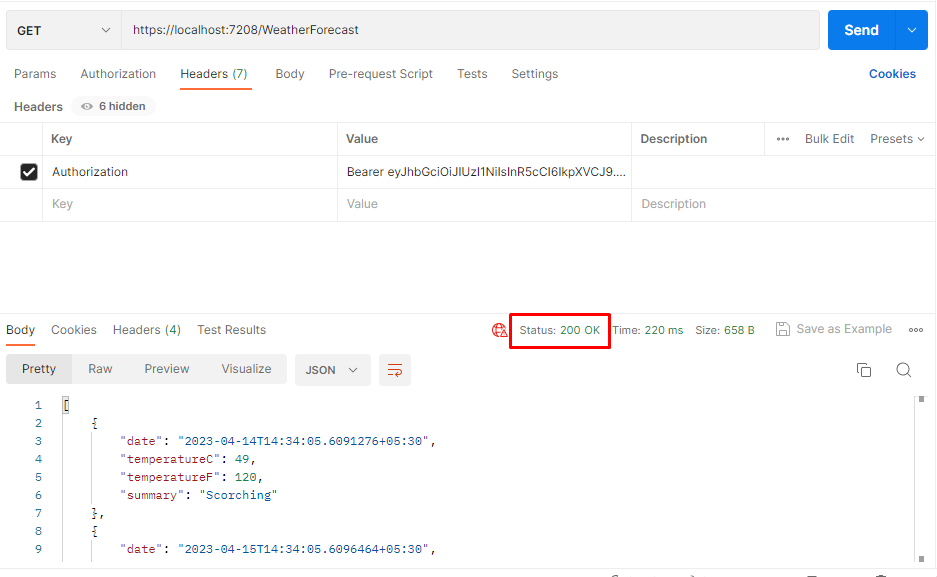
Now we have successfully fetched the data from weatherforecast controller.
Conclusion
In this article, we saw how to create a JSON token in .NET 6.0 ASP.NET Core Web API application and use this token for authentication and authorization by using ASP.NET Identity Framework. We have created two users, one without any role and one with admin role. We have applied authentication and authorization at controller level and saw the different behaviors with these two users.
It's very helpful. Great work!
beginer
19-Apr-2023 at 04:44
Great man! Thanks.
dumytest
10-May-2023 at 02:34
First at all...thanks for your contribution. Tried to implement your code in my project but JWTAppSettings isn't cannot be found
 public class IdentityService : IIdentityService
    {
        private readonly UserManager<IdentityUser> _userManager;
        private readonly RoleManager<IdentityRole> _roleManager;
        private readonly JWTAppSettings _jWTAppSettings;
Can you give me a clue ?

Jose
11-Sep-2023 at 22:58
Thanks @Jose. Just added JWTAppSettings class model in the blog. It was missed. You can take from here too:
using System;
using System.Collections.Generic;
using System.Linq;
using System.Text;
using System.Threading.Tasks;

namespace Noc.Api.Models.AppSettings
{
    public class JWTAppSettings
    {
        public string ValidAudience { get; set; }
        public string ValidIssuer { get; set; }
        public string Secret { get; set; }
    }
}
Rahul Maurya
11-Sep-2023 at 23:57
Now, we can download sample project - added link to download. It will be helpful to implement.
Rahul Maurya
12-Sep-2023 at 01:22
Thanks very much Rahul...much appreciated
Jose
17-Sep-2023 at 01:17
Hi Rahul:
Can you assist me with this please ...I'm stuck
I have an external WEB API which sends the bearer token after the user authenticate
[HttpPost("login")]
public async Task<IActionResult> Login([FromBody] LoginViewModel model)
{
	var result = await _identityService.LoginAsync(model);
	if (!string.IsNullOrEmpty(result?.Token))
	{
		return Ok(result);
	}
	return Unauthorized();
}
The end point ( a ASP.NET Web application) receives the token after the user authenticates via the code below
[HttpPost]
public async Task<ActionResult<string>> Login([FromForm] LoginViewModel model)
{
	var httpClient = _httpClientFactory.CreateClient("HousingWebAPI");
	var body = new StringContent(JsonConvert.SerializeObject(model), Encoding.UTF8, "application/json");
	using (var posting  = await httpClient.PostAsync("Login/login", body))
	{
		posting.EnsureSuccessStatusCode();
		var content = await posting.Content.ReadAsStringAsync();
		return Ok(content);
	}
	return NotFound();
}
Everything up to here works nice thanks to your coding. My problem is
1) I want to store the token after the user authenticate ( the Web API and the Web application are in different projects) . It's said that it should be store in a cookie, database,etc ...but I haven't seen a clear piece of coding
2) Want to send the stored token in the post-authentication requests, like the one below: It's said that the httpClient.DefaultRequestHeaders.Authorization does the trick, but I don't know how to do it with the stored token
[HttpPost]
public async Task<ActionResult<string>> PostData([FromForm] DataTableAjaxPostModel model)
{
	using var client = new HttpClient();
	client.DefaultRequestHeaders.Accept.Add(new MediaTypeWithQualityHeaderValue("application/json"));
	var body = new StringContent(JsonConvert.SerializeObject(model), Encoding.UTF8, "application/json");
	var response = await client.PostAsync("https://localhost:7193/HousingWebAPI/GetData", body);
	if (response.IsSuccessStatusCode)
	{
		var content = await response.Content.ReadAsStringAsync();
		return Ok(content);
	}
	return NotFound();
}
Can you please assist me? Thanking you in advance
Jose
17-Sep-2023 at 01:28
Thanks for appreciation. Here you can store in cookies as:
[HttpPost("login")]
public async Task<IActionResult> Login([FromBody] LoginViewModel model)
{
	var result = await _identityService.LoginAsync(model);
	if (!string.IsNullOrEmpty(result?.Token))
	{
		Response.Cookies.Append("X-Access-Token", result?.Token, new CookieOptions() { HttpOnly = true, SameSite = SameSiteMode.Strict });
		return Ok(result);
	}
	return Unauthorized();
}
And here you can get from cookies:
if (context.Request.Cookies.ContainsKey("X-Access-Token"))
{
	var token = context.Request.Cookies["X-Access-Token"];
}
Refer here: https://alimozdemir.medium.com/asp-net-core-jwt-and-refresh-token-with-httponly-cookies-b1b96c849742
Rahul Maurya
17-Sep-2023 at 03:45
I'm having an issue with you coding. If you follow the link below , you will see that I use your code but I'm using TempData in the endpoint ( Web application) to store the token. What differs your project from mine is the detail that I have to return the result?Token instead of the result which I did.
According to one of the panellist ( at the end of the thread), the Web API has to return a token without apostrophes. I'm racking my brains why the token I store from the API isn't the same one.
Any idea?
How to send back a bearer token after Login in a HTTP Request - Microsoft Q&A
Jose
20-Sep-2023 at 07:09
Try to use following code:
client.DefaultRequestHeaders.Add("Authorization", "Bearer " + token);Instead of following:
client.DefaultRequestHeaders.Authorization = new AuthenticationHeaderValue("Bearer", token);Rahul Maurya
20-Sep-2023 at 07:50
Great conversation! Nicely explained. thanks.
Rashmi
20-Jun-2024 at 22:22

Great work!
Brian
17-Apr-2023 at 19:11