
How to Install n8n on Windows 11 Using Docker Desktop (Local Setup Guide)?


Running n8n locally on Windows 11 is one of the fastest ways to start building automation workflows—without worrying about cloud setup or server costs.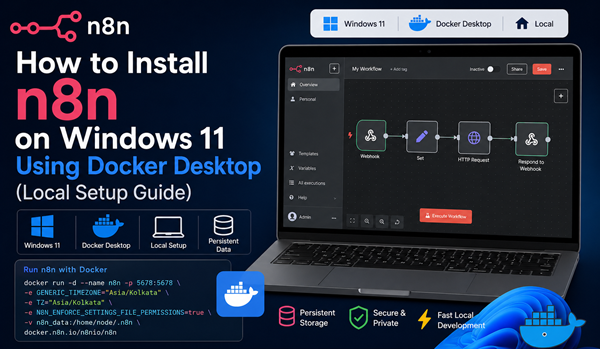
This guide is specifically optimized for:
- ✅ Windows 11
- ✅ Docker Desktop
- ✅ Local development environment
What is n8n?
n8n is an open-source workflow automation tool that lets you connect APIs, databases, and services with minimal code.
Why Use Docker Desktop on Windows?
On Windows, Docker Desktop simplifies everything:
- No manual dependency setup
- Built-in WSL 2 integration
- Easy container management UI
- Works seamlessly with localhost
Prerequisites (Windows 11)
Before starting, install:
- 🐳 Docker Desktop
- Enable WSL 2 (Windows Subsystem for Linux)
🔧 Enable WSL 2 (if not already)
Open PowerShell (Admin):
wsl --installRestart your system after installation.
Step 1: Start Docker Desktop
- Open Docker Desktop
- Wait until status shows “Running”
- Ensure WSL 2 backend is enabled (Settings → General)
Step 2: Create Persistent Volume
Open PowerShell or Command Prompt:
docker volume create n8n_data👉 This prevents data loss when restarting containers.
Step 3: Run n8n Container
Run this command:
docker run -d ^
 --name n8n ^
 -p 5678:5678 ^
 -e GENERIC_TIMEZONE="Asia/Kolkata" ^
 -e TZ="Asia/Kolkata" ^
 -e N8N_ENFORCE_SETTINGS_FILE_PERMISSIONS=true ^
 -v n8n_data:/home/node/.n8n ^
 docker.n8n.io/n8nio/n8n
📝 Notes (Windows-specific)
- Use
^for line continuation in Command Prompt - In PowerShell, you can use backtick
`instead -druns container in background
Step 4: Open n8n in Browser
Go to:
http://localhost:5678You should see the n8n editor UI 🎉
Where is My Data Stored?
Even on Windows, Docker stores volume data inside WSL.
Your workflows are safe inside:
n8n_data volume (Docker managed)👉 You don’t need to manually access it unless debugging.
Stop / Start n8n
docker stop n8n
docker start n8n
Update n8n (Windows)
docker pull docker.n8n.io/n8nio/n8n
docker stop n8n
docker rm n8n
Then re-run the same docker run command.
Optional: Use Docker Compose (Recommended)
Create docker-compose.yml:
version: "3"

services:
  n8n:
    image: docker.n8n.io/n8nio/n8n
    ports:
      - "5678:5678"
    environment:
      - GENERIC_TIMEZONE=Asia/Kolkata
      - TZ=Asia/Kolkata
    volumes:
      - n8n_data:/home/node/.n8n

volumes:
  n8n_data:
Run:
docker compose up -d
Common Issues on Windows 11
Port Already in Use
If 5678 is busy:
-p 5679:5678Then open:
http://localhost:5679Docker Not Starting
- Ensure Virtualization is enabled in BIOS
- Restart Docker Desktop
- Run:
wsl --statusPermission Issues
Add:
-e N8N_ENFORCE_SETTINGS_FILE_PERMISSIONS=true
Pro Tips for Local Development
- Use local SQLite (default) for dev
- Switch to PostgreSQL only for production
- Backup workflows manually before upgrades
- Avoid frequent container recreation without volume
Final Thoughts
Running n8n locally on Windows 11 with Docker Desktop is:
- ⚡ Fast to set up
- 💻 Perfect for development
- 🔒 Safe for experimentation
Once you're comfortable, you can move to:
- VPS deployment
- Reverse proxy + domain
- Production-grade database
Great!
Priya
01-May-2026 at 21:01
Great tutorial! The step-by-step explanation for installing n8n on Windows 11 using Docker Desktop is very beginner-friendly and easy to follow. I especially liked the local setup approach because it helps developers test workflows safely before production deployment. This guide will definitely help automation enthusiasts get started quickly with n8n. Keep sharing such practical DevOps and automation tutorials!
Pratibha
07-May-2026 at 23:10
Awesome content! Many users struggle with local n8n installation on Windows, especially Docker configuration, but this guide makes the process easy to understand. This will save a lot of setup time for beginners entering the automation space. Thanks for publishing such detailed tutorials!
noc
07-May-2026 at 23:12
This is one of the clearest n8n installation tutorials I’ve seen for Windows users. Running n8n through Docker Desktop is highly recommended for stability and portability, and your guide covers the process in a simple, practical way. A great resource for developers, automation engineers, and no-code enthusiasts.
Brian
07-May-2026 at 23:13

Great! It's working. I used above steps mentioned in the blog.
Here is commands used in command prompt:
Microsoft Windows [Version 10.0.22631.6199]
(c) Microsoft Corporation. All rights reserved.
C:\WINDOWS\System32>docker volume create n8n_data
n8n_data
C:\WINDOWS\System32>docker run -d ^
More? --name n8n ^
More? -p 5678:5678 ^
More? -e GENERIC_TIMEZONE="Asia/Kolkata" ^
More? -e TZ="Asia/Kolkata" ^
More? -e N8N_ENFORCE_SETTINGS_FILE_PERMISSIONS=true ^
More? -v n8n_data:/home/node/.n8n ^
More? docker.n8n.io/n8nio/n8n
Unable to find image 'docker.n8n.io/n8nio/n8n:latest' locally
latest: Pulling from n8nio/n8n
241379a89297: Pull complete
28e1e17b5fb8: Pull complete
df6835a8ecd8: Pull complete
e5fa8e894bad: Pull complete
dcf3599d2cf5: Pull complete
6a72349448c8: Pull complete
02a129e7c0d5: Pull complete
d133c4510efb: Pull complete
f9a468cfb60d: Pull complete
aa8a6d834d6b: Pull complete
4f4fb700ef54: Pull complete
4f78707f385e: Download complete
Digest: sha256:2d70fafea7c0c397f40df30daa31243c0bff590e9e87e0430398e7cb4d3d8d0b
Status: Downloaded newer image for docker.n8n.io/n8nio/n8n:latest
81901185fe8414cdd4e9d32aa75f38e375b4e86509ef650bb35a96f58d67e797
C:\WINDOWS\System32>
Rahul Maurya
01-May-2026 at 03:39